


Installing a portable gas water heater can transform your outdoor adventures or garden setup with instant hot water on tap. Camplux outdoor water heaters – especially the Camplux Nano 3 Pro – are popular in the UK for camping showers, off-grid caravan trips, and backyard use. In this guide, we’ll focus on the Camplux Nano outdoor water heater and walk you through a step-by-step installation. We’ll also cover UK-specific considerations like CE certification, gas safety tips, and how to adapt the setup for camping, garden showers, or caravans. By the end, you’ll be able to confidently set up your Camplux water heater and enjoy a hot shower wherever you are!
Meet the Camplux Nano Outdoor Water Heater
(CAMPLUX Nano 3Pro Portable Gas Water Heater 3L/min with Pump) Camplux Nano 3 Pro is a compact, lightweight unit (around 6.2 kg) with convenient handles for carrying. Despite its small size (~370 mm × 400 mm × 170 mm), it delivers about 3 L of hot water per minute – perfect for an outdoor shower or washing up in camp. The Nano 3 Pro features an intelligent LED display for water temperature and error codes, and it runs on LPG (liquid petroleum gas) like propane or butane. A built-in rechargeable battery (4000 mAh) powers the ignition and even a water pump, meaning you don’t need mains electricity in the field. (It can also plug into a 12V car outlet as an alternative power mode.) This model comes with a 12V submersible pump, shower head with hose, and a gas regulator, giving you everything needed for a self-contained hot water system.
Camplux offers other portable models (such as 5 L and 10 L tankless water heaters) which operate similarly. These larger models provide higher flow rates (5–10 L/min) for multiple uses or bigger groups, and often include similar safety features and accessories. The good news is the installation process for the Camplux Nano will also apply to these other models with only minor differences. Before we dive into the installation steps, let’s go over important safety and certification details specific to the UK.

Safety First: CE Certification and UK Gas Guidelines
Safety is paramount when installing gas appliances. The Camplux Nano and other Camplux gas water heaters are CE-certified, meaning they comply with the EU’s Gas Appliance Regulation standards for safety (Camplux BW158BC 6L Gas Water Heater). (This includes features like flame failure shut-off, overheat protection, and a 20-minute automatic safety shutoff on many model (Camplux AY132P43 Portable Gas Propane Water Heater with 4.3L Water Pump). Even after Brexit, CE certification is still recognised in the UK, indicating the product meets rigorous safety requirements. In addition, Camplux units are often tested by bodies like TüV for quality, giving you extra peace of mind.
That said, always follow gas safety best practices when setting up and using your water heater (Gas Safety Tips for Operating Your Camplux Heater). Here are a few crucial safety guidelines:
- Outdoor Use Only: Camplux “outdoor” water heaters (including the Nano) are designed for outdoor use or very well-ventilated areas only. Never install or operate the unit indoors or in enclosed spaces like tents, sheds, or inside a caravan. Carbon monoxide can accumulate and become deadly in unventilated areas. If you must use it under a shelter or awning, ensure at least one side is fully open to fresh air, and keep a carbon monoxide detector nearby as an extra precaution.
- Stable, Safe Location: Mount or place the water heater on a solid, non-combustible surface away from any flammable materials. The exhaust vent (on top of the unit) gets hot, so keep it clear of overhanging roofs, tarps, or foliage. Some models come with a hook or you can hang the unit by its handles on a sturdy bracket or stand, which is ideal for shower setups. If using it in the garden, a wall or fence mount at about shoulder height works well – just make sure it’s secure.
- Proper Gas Cylinders & Regulators: Use the correct LPG bottle and regulator. The Camplux Nano is compatible with propane or butane gas, but in the UK propane is usually recommended (especially for colder weather performance). The unit typically includes a 37 mbar propane regulator that clips onto standard UK propane cylinders (27 mm clip-on type, like the green Calor Patio Gas bottles) (Camplux BW158C 6L Gas Water Heater). If you plan to use a blue butane cylinder, you’ll need to obtain a separate 28–30 mbar butane regulator, as the included one is for propane. Always double-check that the rubber O-ring or washer in the regulator fitting is present and in good condition to ensure a gas-tight seal.
- Check for Gas Leaks: Whenever you connect the gas regulator to the water heater and cylinder, test for leaks before igniting. To do this, turn on the gas supply briefly and use a solution of soapy water on all connections (around the regulator, hose fittings, and bottle valve). If you see bubbles forming, you have a leak – immediately shut off the gas, tighten the connections, or use gas-rated PTFE tape if applicable, then test again. Never use a flame to check for leaks! This simple soapy water test is an essential safety step at initial setup and whenever you reconnect the gas.
- Ventilation and Flame Safety: The Camplux has built-in safety sensors (flame failure protection will cut gas if the flame goes out, for example). Still, you should ensure plenty of fresh air circulation when the unit is running. Keep the area around the burner clear. The burner will ignite automatically when water flows, so keep hands and face away from the exhaust and front burner area during startup. If the unit fails to ignite and you smell gas, turn everything off and ventilate the area before troubleshooting.
- UK Regulations: If you’re integrating the water heater into a more permanent setup (like plumbing it to a cabin or installing in a camper conversion with a fixed gas line), be aware of UK gas regulations. Permanent gas installations should be inspected or done by a Gas Safe registered engineer. However, for typical portable use (connecting to a bottle for temporary outdoor use), it’s designed as a DIY-friendly appliance. Always follow the manufacturer’s instructions to the letter, and if in doubt, consult a professional.
- CE/UKCA Labels: Ensure your unit has the proper certification labels (CE marking, and UKCA marking if applicable). The Camplux will have a data plate or sticker confirming it’s CE certified. This means it meets safety standards for sale in Europe/UK – including aspects like heat shielding, stable gas pressure, and emergency shutoff systems (Camplux BW158C 6L Gas Tankless Instand Water Heater). Do not use any gas appliance that looks tampered with or missing these labels.
Following these safety guidelines will set a solid foundation for a successful installation. Now, let’s gather what you need to get your Camplux water heater up and running.
What You Need for Installation
Before you start, make sure you have all necessary parts and tools on hand. Here’s a checklist of items and accessories you’ll need for installing a Camplux outdoor water heater in the UK:
- Camplux Water Heater and Included Accessories: Unbox your Camplux Nano (or other model) and verify the contents. You should have the main water heater unit, a gas hose with regulator attached, a shower head with hose, a pump (for the Nano series or any model that includes one), and mounting hardware like a shower head bracket. Read through the quick-start guide or manual that came with the unit – it often lists all included parts and has model-specific notes.
- LPG Gas Cylinder: Obtain a suitable propane gas cylinder to fuel the water heater. Common choices in the UK are 5 kg or 13 kg Calor Patio Gas bottles (which use the green 27 mm clip-on regulators) or standard propane cylinders with an appropriate connector. Propane is preferred for most outdoor water heaters because it works better than butane in low temperatures (butane can struggle to vaporise in cold UK winters). If you only have a butane bottle (blue Calor butane, etc.), remember you’ll need a butane regulator and the gas output may reduce in cold weather.
- Gas Regulator and Hose: The Camplux Nano comes with a pre-fitted gas regulator and hose assembly for propane (Camplux Nano 3Pro Portable Gas Propane Wate Heater 3L/min with Pump)
- . This regulator typically clips directly onto your propane bottle valve. Ensure the hose is securely clamped to both the regulator and the water heater’s gas inlet. If your model didn’t include a regulator (some larger models assume you’ll supply your own), get a 37 mbar regulator certified for LPG. Tip: The provided regulator in the UK models usually has a safety relief and is CE approved – use that for best compatibility. For butane users, purchase a 28–30 mbar regulator separately.
- Water Source & Hose: Decide how you will feed water to the water heater. If you’re in a garden or campsite with a water tap, a garden hose can be connected to the water heater’s water inlet. Many Camplux kits include an adapter that fits a standard hose connector. Ensure you have a hose long enough to reach your water source. If you’re off-grid (camping by a car, etc.), you’ll use the 12V pump supplied: you’ll need a container (bucket, jerry can, collapsible water carrier, etc.) filled with clean water. The pump will drop into this container to supply the water heater. Make sure the water is reasonably clean (free of heavy debris); avoid using saltwater or dirty pond water as it can clog the unit. If using a natural source (river or lake), you might want a pre-filter on the pump or to let sediment settle in a bucket.
- Power Source (Batteries/12V): The ignition and pump require a power source. For the Nano 3 Pro, ensure its internal battery is fully charged before your trip (charge it via the 12V car adapter or a suitable charger). The device can also run directly from a 12V DC outlet in a car or camper van. If you have an older Camplux model (like the 5 L AY132), it likely uses 2 × “D” cell batteries in a compartment – have fresh batteries ready to install. No mains electricity is needed, which is why these units are so handy for camping. Just double-check the battery compartment is dry and the batteries or rechargeable pack are installed correctly.
- Basic Tools: You generally won’t need heavy tools. A spanner (wrench) may be useful to tighten any threaded connections (for example, if your regulator screws onto a bottle, or if the shower hose connections need a snug fit). A Philips screwdriver might help attach mounting hooks or the shower head holder to a post or wall. Also prepare a spray bottle or brush with soapy water (for leak testing, as mentioned). Keep a roll of PTFE tape rated for gas fittings on hand – usually, the gas hose connections come pre-sealed with washers or tape, but it can be useful if you encounter a small leak at a threaded joint (do not use tape on the regulator-to-bottle connection though; those use compression seals).
- Optional Accessories: Depending on your setup, a few extra accessories can make your life easier. For semi-permanent garden use, you might get a rain cover or weatherproof “rain cap” for the water heater (some Camplux models include a rain cap to protect the top vent (Camplux First F5 5 litres Gas Water Heater with Adjustable Handle, Portable LPG Shower).
- A hose splitter or adaptor can allow you to keep a garden hose attached and still use it for other tasks. If camping, a shower tent or enclosure is great for privacy (just keep the water heater itself outside the tent!). Additionally, you might consider quick-connect fittings for the water and gas lines to speed up setup/takedown. For more ideas on enhancing your setup, check out our Must-Have Accessories for Your Camplux Water Heater guide, which covers items like carry cases, stands, and spare parts that can complement your water heater.
Once you have everything ready, it’s time to set up the water heater. Make sure you are in a safe outdoor area and let’s go step by step.
Step-by-Step Installation Guide
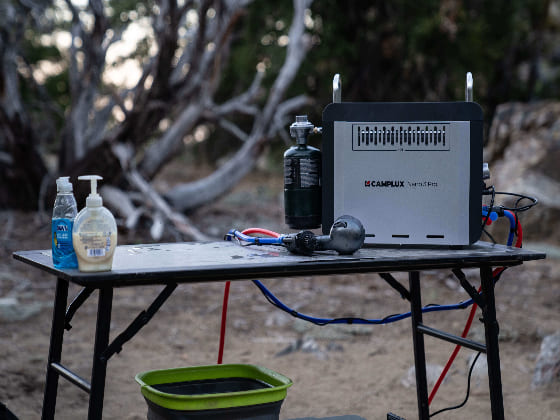
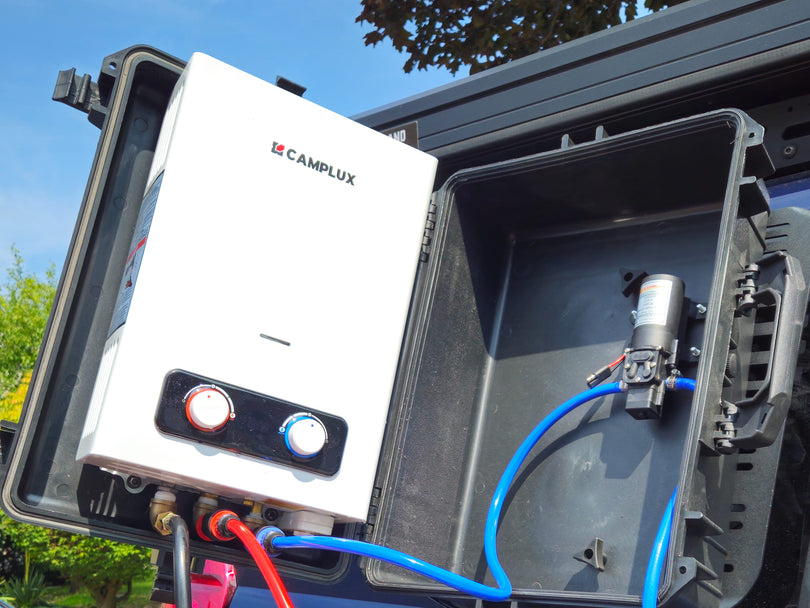
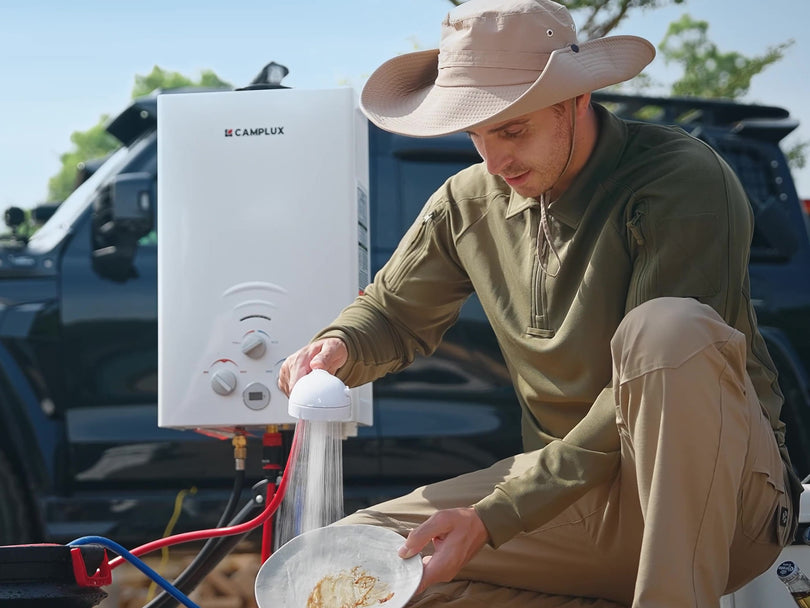
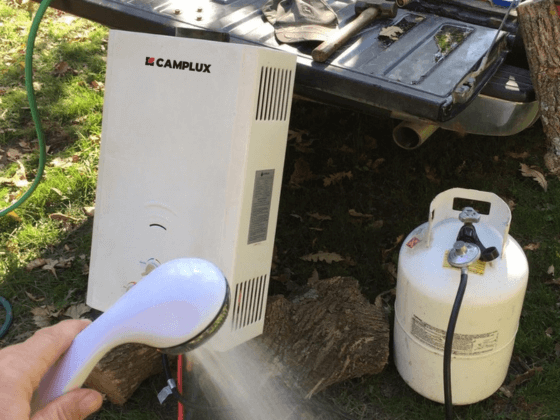
(CAMPLUX Nano 3Pro Portable Gas Propane Water Heater 3L/min with Pump) Setting up a Camplux portable water heater at camp: in this example, the Nano 3 Pro draws water from a tub using its 12V pump (blue hose) and heats it for washing dishes via the shower head (red hose). Installing yours will involve connecting the gas supply, hooking up the water inlet and outlet, and powering the unit safely. Follow the steps below to get your Camplux water heater installed and running:

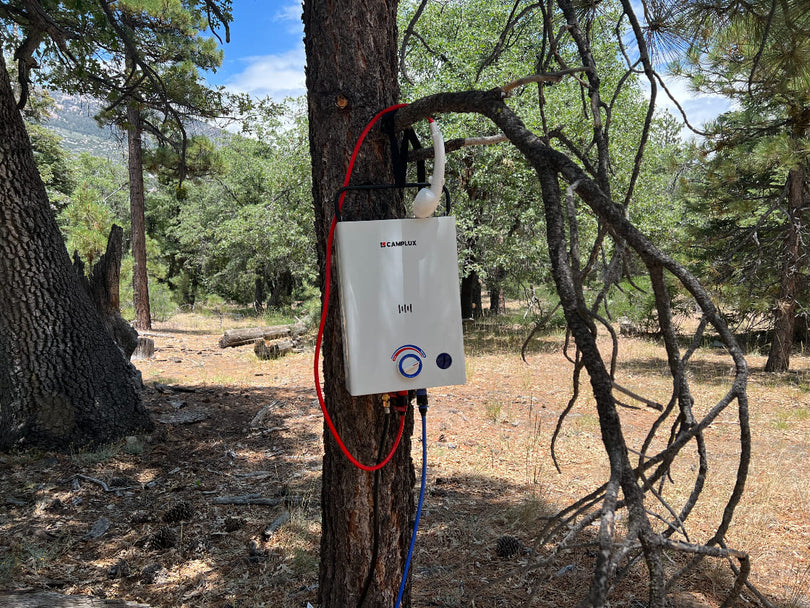
- Choose a Safe Location: Pick an appropriate spot outdoors for your water water heater. It should be a well-ventilated area on level ground or a mounted position where the unit can stay upright. If you’re camping, set the water heater a few feet away from your tent or caravan (so that any exhaust blows away from living spaces). For a garden or home setup, avoid placing the water heater directly under overhangs or low roofs – the hot exhaust needs open air. Ensure there’s no flammable material immediately above or around the water heater. If possible, position the heater at a height convenient for use: many users hang the unit on a hook or bracket at about 1.5–2 m high (chest to head height), which helps the shower hose reach comfortably and keeps the unit off the ground. Tip: If the weather is damp, try to shelter the unit from direct rain. The Camplux is weather-resistant and often has a rain cap (or you can DIY one), but keeping it somewhat sheltered will prolong its life.
- Unbox and Inspect the Unit: Place the Camplux water heater on the ground or a work surface and remove any protective packaging. Verify that the gas knob and water flow knob (if your model has one) are in the OFF position. On the Nano’s digital panel, ensure the main power switch is off for now. Check the battery compartment (bottom of the unit) is closed and any battery switch is off. Inspect all ports: you’ll see a gas inlet, a water inlet, and a water outlet (these are usually labeled or distinguishable by size/colour – e.g. on the Nano, the water inlet and outlet are often colour-coded blue and red). Make sure the supplied O-rings or gaskets are in place on the hose connections. If you have a pump, take it out and note which connector it plugs into (the Nano has a separate 12V socket for the pump power). Take a moment to read the quick start section of the manual – confirm any model-specific steps (for instance, some models require inserting D batteries at this point). Having everything laid out will make the assembly easier.
- Attach the Gas Regulator to the Water Heater: Locate the gas inlet on the Camplux unit (usually a brass fitting on the back or side). Your regulator hose assembly will attach here. If it’s a screw-on fitting, align it carefully and turn the nut clockwise (it may be a plastic knob or a metal nut) onto the inlet threads. Hand-tighten first, then give it a snug turn with a spanner – do not over-tighten (over-tightening can crush the O-ring). If your regulator uses a quick-release coupling, simply push it on as instructed. Ensure the connection is secure; the hose should not wobble or leak at this joint. Note: The Camplux-supplied regulator usually has a black rubber washer pre-fitted in the connector – double-check that it’s seated properly before tightening. This washer creates the gas-tight seal at the inlet.
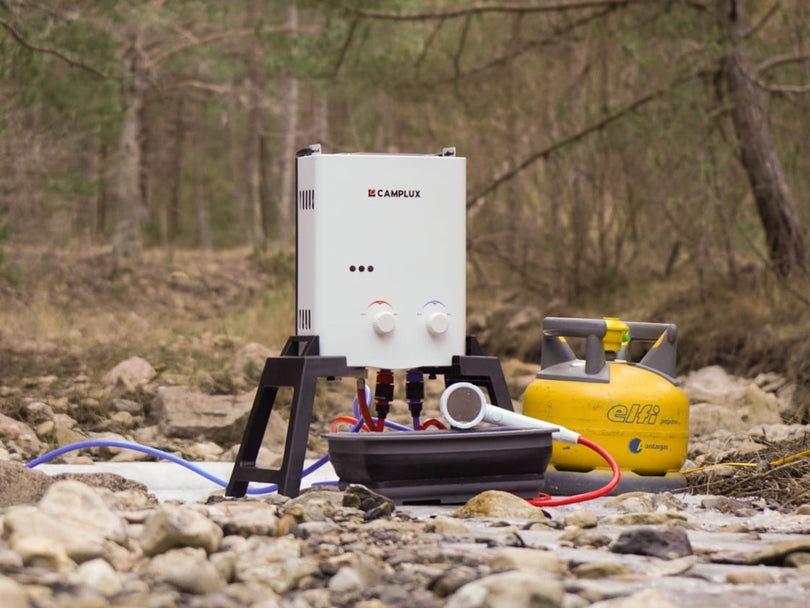
- Connect the Regulator to the Gas Cylinder: Now, attach the other end of the gas regulator to your LPG bottle. For clip-on regulators (27 mm type common in UK for propane Patio Gas), make sure the regulator’s lever or collar is in the “off” or open position, press it down firmly onto the cylinder valve, then flip the lever or lock down to secure it. You should hear or feel it latch. For screw-on regulators (POL fittings, mostly on larger propane or butane bottles), align the nut and turn left-hand (counter-clockwise) to tighten (most gas fittings to cylinders are reverse threaded). Use a spanner to fully tighten a POL nut—snug but again not excessively forceful. Once connected, slowly open the cylinder’s main valve (or turn the clip-on lever to the on position). You might hear a slight hiss as the hose pressurises; that should stop quickly. Immediately perform a leak test: spray or apply soapy water around the cylinder valve connection and the joint where the regulator attaches to the water heater. Look closely for any bubbling, which indicates a leak. If bubbles appear, turn off the gas, tighten the connections and test again. All connections should remain bubble-free when gas is on. This step is critical for safety – never skip the leak test during initial setup!
- Connect the Water Inlet Hose: Decide whether you’re using the pump or a direct hose:
- Using a Garden Hose: If you have a water tap available, connect one end of your garden hose to the tap and the other end to the water inlet of the water heater. The Camplux often includes an adapter that screws onto the inlet to fit standard hose quick-connectors. Ensure any rubber washer in the adapter is in place to prevent water leaks. Do not turn on the water yet.
- Using the 12V Pump: If you’re off-grid, take the provided pump assembly. One end of the pump’s hose should attach to the water heater’s water inlet (it may already be attached in the box). It might be a push-fit or screw coupling – secure it firmly. The other end is the pump device with a filter on it. Submerge the pump into your water container (bucket, jerry can, etc.). Make sure the pump filter is fully underwater and that the water level is sufficient (you don’t want the pump sucking air). It’s a good idea to keep the container nearby and not much lower than the water heater, so the pump doesn’t have to work too hard. Note: Don’t plug in or power the pump just yet; we will do that when starting the unit. Also, do not use salty or muddy water through the water heater – if that’s all that’s available, you should filter it first or know that it may clog/shorten the life of the water heater.
- Attach the Shower Hose to the Outlet: Take the shower head and hose that came with the water heater. Connect the shower hose to the water heater’s water outlet (usually marked or obvious as the remaining connection point). This might screw on similarly to a garden hose fitting or snap into place. Again, ensure a snug connection so it doesn’t leak under pressure. The shower head is typically already attached to the hose; if not, screw it onto the hose’s end. There may be a small on/off switch or trigger on the shower head itself – set that to the off position for now (closed position). Mount the shower head on the bracket or hook if one is provided (some kits have a little plastic hanger you can attach to a pole or wall). Having the shower head secured at about head height will be handy for testing (and later, showering).
- Power Up the Unit: Now that gas and water lines are connected, it’s time to power the Camplux water heater. For the Camplux Nano 3 Pro, flip the battery switch located at the bottom of the unit to the ON position (this makes the internal battery active). Then, on the front control panel, turn the main power switch to ON as well. If your Nano is completely new or the battery isn’t charged, you may instead connect the 12V DC car adapter cable to a 12V outlet (like a car cigarette lighter port or a portable power station) – this can both run the device and charge the battery. For older battery-operated models, insert the D-cell batteries in the compartment (respect the +/- orientation) and close it securely. There is usually no “on” switch for those – they become active when water flows. Important: At this point, double-check that your gas knob (flame control) is set to a middle setting and any water flow knob is set to an appropriate setting (maybe medium as well). Setting knobs to mid-range provides a safe starting point so you don’t immediately get scalding hot or cold water. Also ensure the pump’s power cord is plugged into the water heater’s outlet (on the Nano, the pump lead plugs into the unit so it can draw power from the internal battery). Keep the pump’s power off for the moment if it has a separate switch.
- Ignite and Test the Water Heater: Everything is connected and powered, so it’s time to ignite the water heater by turning on the water flow. Open the water supply: if using a garden hose, turn on the tap slowly. If using the pump, activate it (this might mean turning a switch on the unit or simply opening the shower head flow which triggers the pump, depending on model). As water begins to flow into the water heater, the Camplux’s flow sensor will start the ignition sequence. You should hear a series of clicks from the unit as the burner ignites, and possibly see the burner light through a little viewing window (if your model has one). Hot water will start coming out of the shower head within a few seconds. Check the output: Feel the water (cautiously!) to ensure it’s warming up. The Nano’s display should show the outlet temperature; typically it might rise to, say, 30–40 °C initially. If water is flowing but you don’t get hot water or hear ignition, turn off the water flow after a few seconds and troubleshoot: (a) Is the gas cylinder valve definitely open? (b) Is the battery switch on and battery charged? (c) Is the shower head switch definitely open to allow water flow? (d) If using the pump, is the pump running and pushing water? You may need to prime the pump by tilting it to release air or ensure the water source isn’t empty. Once these are confirmed, try again. The ignition should fire when sufficient water flow is detected. (On some models, there’s a minimum flow requirement around 2–3 L/min; the pump provided should meet this, and mains water definitely will unless pressure is extremely low.)
- Adjust the Water Temperature: After ignition, let the water run for a minute and observe the temperature. Adjust the controls to reach your desired heat. On Camplux water heaters, there are typically two controls:
- The gas regulator knob on the unit (often labeled MIN to MAX or a flame icon) which controls the burner intensity. Turning it up (toward MAX) increases the flame size, thus heating the water more (useful in winter when inlet water is very cold). Turning it down yields a smaller flame for cooler water or fuel saving.
- The water flow knob (often labeled with a water icon or MIN/MAX). Not all portable models have a separate water flow control, but if yours does, turning it towards MIN will restrict water flow (resulting in hotter water, since the water spends more time in the water heater and the flame doesn’t change) and turning to MAX increases flow (cooler water, but more volume).
- With the Camplux Nano’s digital display, you can monitor the outlet temperature as you adjust. Aim for a comfortable shower temperature (typically ~38–43 °C). If the water is too hot, you can increase the flow or decrease the gas a bit. If it’s too cool, do the opposite – boost the gas or reduce the flow slightly. Also consider the inlet water temperature: in summer, inlet water may be warmer, requiring less gas; in winter, you may need to max the gas to get adequate heat. Make small adjustments and give the unit a few seconds to respond. Once you’re satisfied, you’ve successfully installed and started your water heater!
- Secure and Use the Water Heater Safely: With hot water flowing, do a final check around the unit. Ensure there are no water leaks at the connections (tighten any hose coupling if you see drips). Also verify no gas leaks are present (you shouldn’t smell gas at all once it’s running; the flame should be steady). Now you can enjoy the hot water – whether it’s a shower, washing dishes, or cleaning up outdoors. When you’re done using the water heater, follow proper shutdown steps: turn off the water flow first (this will usually extinguish the burner flame within seconds as the flow stops). Then turn off the gas supply at the cylinder. Finally, switch off the water heater’s power (battery switch off, etc.).
- Never leave the unit running unattended. If you’re packing up camp, disconnect the gas and let the heater cool down for a few minutes before storing it. If the water heater will remain outdoors (e.g. mounted in your garden), be sure to shut the gas off and ideally disconnect the bottle between uses for safety. Also, drain any water out of the unit by disconnecting the hoses – this prevents water from sitting inside and helps avoid freezing damage in cold weather (the Camplux has a drain plug usually – open it to let out water). For winter or long-term storage, see our section on winterizing below.
By following these steps, you should have your Camplux water heater installed and producing hot water. Next, we’ll discuss a few extra tips for different usage scenarios – whether you’re camping in the wild, setting it up for a home garden shower, or integrating it into your caravan adventures.
Outdoor Installation Tips for Camping, Gardens, and Caravans
Installing and using the Camplux water heater can vary slightly depending on your setting. Here are some scenario-specific tips to help you out:
Camping Setup Tips
When camping, portability and safety are key. Always operate the water heater outside your tent or camper. A common approach is to set up a camp shower tent for privacy: you run the shower hose and head inside the tent, while keeping the water heater unit and gas cylinder safely outside. This way, you stay warm and private, but any exhaust or gas stays outdoors. Ensure the hoses can pass through a gap or window in the tent (many shower tents have a little opening or velcro seam for this purpose). Place the water heater on stable ground – if the terrain is uneven, consider carrying a small wooden board or metal stand to serve as a level platform. During camping, you might be using the 12V pump with a water container: try to use lukewarm water in your container if possible (leave it in the sun or add a kettle of hot water) so that the water heater doesn’t have to work as hard and you get a hotter shower. Always keep an eye on your gas level; a 5 kg propane bottle can heat many showers, but if you’re out for an extended trip with multiple people showering, bring a spare gas canister. Finally, respect campsite rules – some campgrounds have specific guidelines for gas appliances, so make sure using a portable shower is permitted and do it away from other campers for privacy and safety.
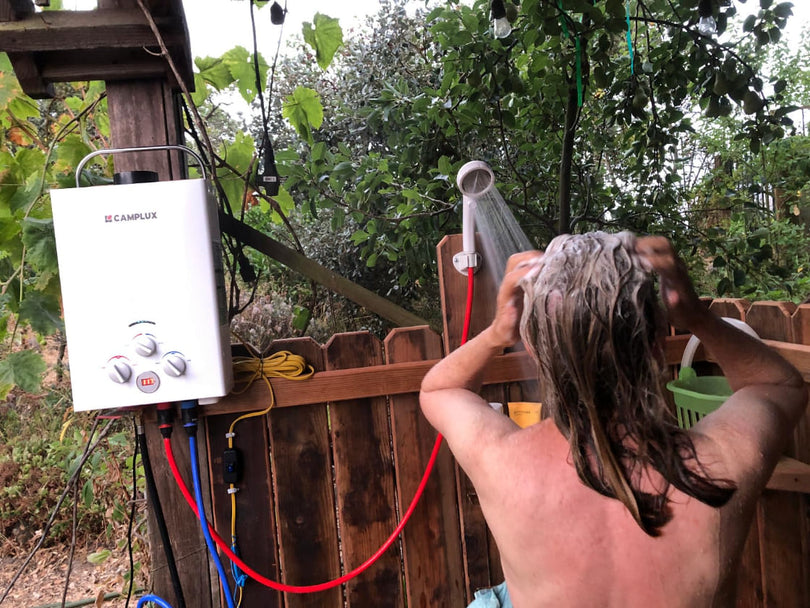
Garden (Backyard) Shower Tips
For home use, such as a garden shower or filling an inflatable hot tub, the Camplux can be semi-permanently set up. Mount the water heater on a wall or sturdy wooden post near your desired shower spot. Many users attach a wooden board to a fence and then hang the unit on screws for easy removal. Use the garden hose for water supply for convenience – you might install a splitter on your outdoor tap so one side feeds the Camplux and the other is free for a regular garden hose. Keep the gas bottle on a level surface; for aesthetic and safety reasons, you can store it inside a ventilated gas bottle box or cover (just not fully sealed – gas bottles need ventilation). Because UK weather is unpredictable, try to protect the unit from direct rain. A simple overhanging shelter or the aforementioned rain cap accessory will help keep water out of the burner and vents when not in use. After each use, it’s wise to turn off and disconnect the gas, and drain the unit if temps might drop low. If you plan to leave the water heater outdoors all the time, consider winterizing it during the cold months (drain all water and perhaps bring it indoors if temperatures fall below freezing). Our article on Winterizing Your Camplux Water Heater: A UK Guide offers a detailed look at protecting your unit in winter. Another tip: incorporate the water heater into your garden decor – for example, some people create a wooden enclosure or a trellis that hides the unit and routes the shower hose neatly, making their outdoor shower area look tidy while still allowing easy access for maintenance.
Caravan or Camper Use
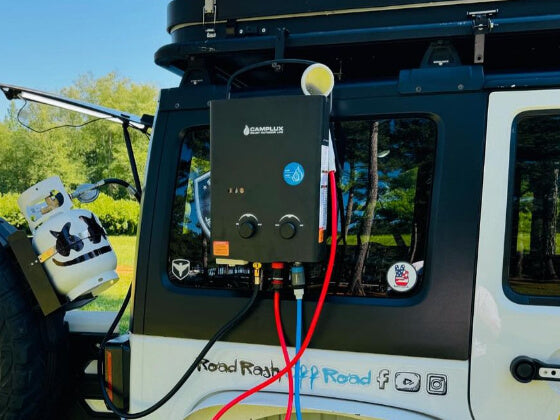
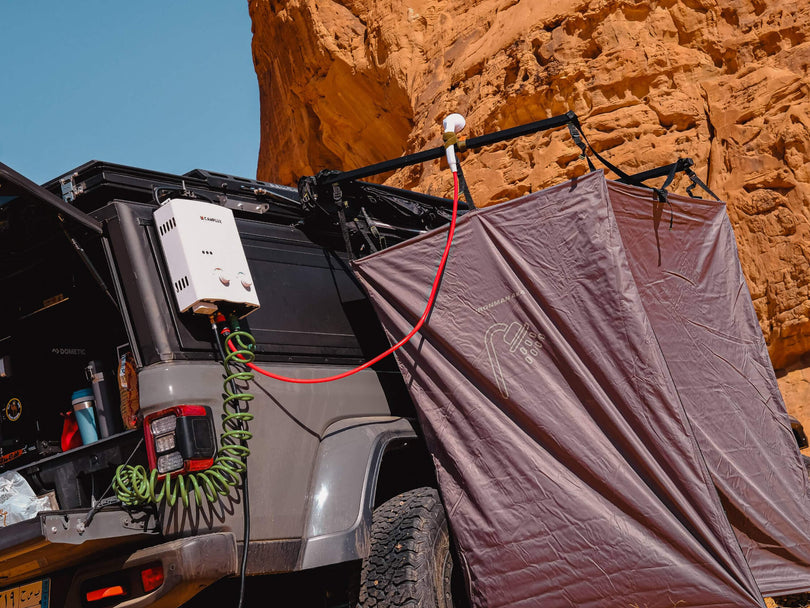
Camplux water heaters are a favourite among caravan and campervan users who want a hot shower off-grid without installing a permanent water heater. If you’re touring in a caravan, you likely already have a propane gas bottle on board (for your cooker or heating). You can use that same bottle to feed the Camplux, but do so externally: it’s best to set up the Camplux unit outside the caravan, connected directly to the bottle (rather than plumbed into the caravan’s internal gas system, unless you have a quick-connect gas outlet and know what you’re doing). One idea is to mount the Camplux on an exterior side wall or on a fold-out bracket that you can deploy at camp. Just remember to disconnect and stow it when driving. If your caravan has an external shower point, you might bypass that and use the Camplux for warmer water – but again, only operate it outdoors with adequate ventilation. Water supply in a caravan setup might come from your onboard pump and tank: you could connect the Camplux water inlet to your van’s water outlet or even dunk the Camplux’s pump into a portable water container that you refill from the main tank. The flexibility is great – you get to use the caravan’s resources without permanent alterations. For campervans or overlanders, the Camplux Nano’s compact size is a big plus; it can even be carried in smaller RVs and deployed at rest stops for a quick shower. Just be mindful of wind direction when showering near your vehicle (so exhaust isn’t blowing into the van). Also, always cool and secure the unit before driving off. If you’re an avid caravanner, you might enjoy our dedicated post Camplux Water Heaters: A Must-Have for Your Caravan Adventures which explores how portable water heaters enhance life on the road.
No matter the scenario, the core principles remain the same: keep it ventilated, keep it safe, and enjoy the luxury of hot water wherever you are! Now that your water heater is installed, let’s touch on maintaining your Camplux unit and ensuring it lasts for many trips to come.
Maintenance and Aftercare
A little routine maintenance will go a long way in keeping your Camplux outdoor water heater running smoothly. Here are some tips to maintain your unit and maximise its lifespan:
- Regular Inspection: Before each use (especially if the unit has been in storage), give the water heater a quick once-over. Check that there are no debris or spiders in the burner area or vents (insects sometimes nest in gas appliances). Ensure hoses are not cracked or damaged. Verify the gas regulator is still in good shape and that O-rings haven’t dried out.
- Cleaning the Water Filter: Most Camplux portable water heaters have a small water filter screen either at the water inlet or at the pump’s end. Periodically remove this and rinse off any sediment or dirt. Clean water flow is essential for proper operation. If you notice reduced flow or uneven spray from the shower head, the filter or shower head may have mineral buildup – soak them in vinegar solution to descale.
- Drain After Use: If you’re not going to use the water heater for a while, especially in cold weather, drain all water out of the unit. There’s often a drainage plug or you can simply disconnect the hoses and tilt the unit to empty the heat exchanger. This prevents internal corrosion and freezing damage. (Water expanding as it freezes can crack the internal pipes – a leading cause of damage in portable water heaters.) For detailed cold-weather care, see Winterizing Your Camplux Water Heater: A UK Guide for step-by-step advice on preparing the unit for winter. This includes draining techniques and storing the water heater in a frost-free place during off-season.
- Gas Safety and Storage: When not in use, always turn off the gas at the cylinder. If you’re disconnecting the bottle, put the protective cap back on it. Store the gas cylinder in a safe, upright position outdoors or in a well-ventilated area – never inside your living space. For the water heater, once it’s cooled, you can cover it with a waterproof cover or bring it indoors if convenient. (Just remember: never operate it indoors – storage is fine, but use is outdoors only.) If you smell gas during use or storage, address it immediately – either a connection is loose or the unit may need servicing. It’s wise to have a Gas Safe registered technician inspect the water heater every couple of years if you use it frequently, just to ensure all seals and burners are in top condition.
- Routine Servicing: Follow any maintenance schedule recommended by Camplux. This might include checking the burner for clean flame (a healthy flame is mostly blue). If the flame is yellow or producing soot, the unit may need cleaning or adjustment. Also, keep the battery (if rechargeable) in good health – charge it as instructed and do not let it sit for extremely long periods fully discharged. If using D batteries, remove them during long storage to avoid leaks. For more general upkeep pointers, see our guide on Routine Maintenance Tips for Camplux Outdoor Water Heaters, which covers tasks like cleaning the burner, storing the unit, and replacing parts like hoses or igniters if they wear out.
By caring for your Camplux water heater, you ensure it will be ready to give you hot water on demand for years to come. Now, let’s wrap up with a quick FAQ to address some common questions about installing and using a Camplux outdoor water heater in the UK.
FAQ: Common Installation Questions
Q: Can I use the Camplux outdoor water heater indoors or in a garage?
A: No – these portable Camplux units are strictly designed for outdoor use or very well-ventilated areas. Using them indoors (or in an enclosed garage, shed, etc.) is dangerous due to the risk of carbon monoxide poisoning and lack of proper flue ventilation. If you need hot water indoors, look for a room-sealed unit with a flue designed for indoor installation. Otherwise, always set up your Camplux outside, and just run the hot water indoors if needed (for example, via a long hose to an indoor tub). Safety first!
Q: What type of gas bottle should I use in the UK, and how long will it last?
A: Use a standard LPG propane cylinder – the green Calor Patio Gas bottles in 5 kg or 13 kg sizes are ideal, since the Camplux comes with a regulator to fit those. You can also use red propane cylinders (e.g. 3.9 kg, 6 kg) with an appropriate screw-on regulator, or even Campingaz/Butane bottles if fitted with a 30 mbar regulator (though butane is less efficient in cold weather). As for longevity, it depends on usage. The Camplux Nano’s burner is about 6 kW (around 450 grams of gas per hour at full flame). In practice, a 5 kg propane bottle might provide roughly 10–15 hours of continuous hot water use. For typical camp showers (say 5–10 minutes each), that could mean dozens of showers. Always carry extra gas if you’re going on a long trip – running out of gas mid-shower is no fun!
Q: Do I need a Gas Safe engineer to install or check my portable water heater?
A: Not for the basic portable setup. Part of the appeal of Camplux portable water heaters is that they’re meant for DIY installation – connecting a hose to a bottle is similar to hooking up a BBQ. As long as you follow the manual and safety steps (especially leak testing), you can set it up yourself. However, if you plan any kind of more permanent installation (for example, plumbing it into a cabin or mounting it in a campervan with a fixed gas line), then yes, it’s wise (and often legally required) to involve a Gas Safe registered professional. They can ensure the gas piping, ventilation, and any flue (if added) are all safe and up to code. For normal portable use, just be diligent with your own safety checks each time.
Q: The water heater doesn’t ignite when I turn on the water – what could be wrong?
A: First, double-check the basics: Is the gas cylinder valve open? Is the battery switch on and battery charged (or fresh batteries installed)? Is the water source sufficient (pump fully submerged or tap turned on enough)? If those are okay, a couple of things to try: (1) Water flow too low – ensure the shower head valve is fully open and any flow knob on the water heater is not set too low. There’s a minimum flow needed to trigger ignition. (2) Air in the gas line – sometimes the first time you use it, air pockets in the gas hose can delay ignition. Try turning off water, waiting a minute, then attempt again. (3) Battery issue – if the ignition battery is weak or not making contact, the spark might not fire. For Nano, check the charge; for D-battery models, re-seat the batteries or replace them. (4) Wind – if it’s very windy, the flame might not catch; shield the unit from strong winds during start-up. If you hear clicking but no “whoosh” of flame, it’s usually gas or spark related. If you get a flame that dies when water flows, it could be a water flow sensor issue or the gas is running out. Consult the manual’s troubleshooting section – and remember to turn everything off while diagnosing the issue. Once resolved, it should ignite with the characteristic click-click-woosh every time you open the shower flow.
Q: Is the Camplux water heater CE certified and legal to use in the UK?
A: Yes, Camplux portable gas water heaters are CE certified for the EU/UK market (Camplux AY132B Portable Gas LPG Tankless Water Heater For Outdoor). They comply with the necessary safety standards (in fact, the Camplux 6 L model, for example, is stated to meet CE GAR requirements and includes multiple safety protections (Camplux BD158 6 litres Gas Water Heater). In the UK, the equivalent is the UKCA marking which Camplux is transitioning to as needed. As a consumer, you can legally use these appliances for outdoor purposes. Just ensure you use them as intended (outdoors, with proper gas bottles, etc.). The CE mark means the manufacturer attests the product is safe when used according to the manual. It’s always a good idea to register your product if the manufacturer offers it, so you get any updates or safety notices. And of course, follow all usage guidelines to maintain that safety.
By now, you should have a fully installed Camplux outdoor water heater and a good understanding of how to use it safely in the UK. Whether you’re camping under the stars, rinsing off after a dip in the sea, or enjoying a hot garden shower, the Camplux Nano will deliver that comforting hot water on demand. Just remember to stay safe, perform your leak tests and maintenance, and you’ll be saying goodbye to cold showers on all your adventures. Happy heating, and enjoy your outdoor hot water!